· Anytime you go into the Settings on FOLIO, check your calendar. Is it current? Are you at the end of the semester? Apps > Settings > Calendar
· Before you can set up your patron notice policies, you must first configure your Patron notice templates.
· Note: Reminder fees and Title level hold requests do not use the patron notice policy. See Reminder fees and Title Level Requests Notice templates.
· You can set up multiple notices in one policy. Libraries’ needs differ. Some will want to create several policies with one or few notices in each policy. Other libraries may find it advantageous to create few policies, each containing several notices.
· Additionally, patron notice policies can be associated with more than one circulation rule but keeping it simple isn’t a bad idea.
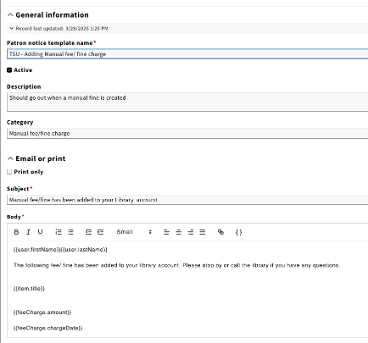
· Finally (for now) – don’t forget the Manual Fine/Fee template as well (see below).
Apps > Settings > Circulation > Patron Notices
1. Policies
2. Templates
Templates: Your specific communication to patrons. In other words, your notice in your language saying what you want to to the people you engage with. Both local and OpenRS.

Covenant has a template for just about “any” occasion.
For example, Faculty Overdue Notice (for the 1st and 2nd notice):
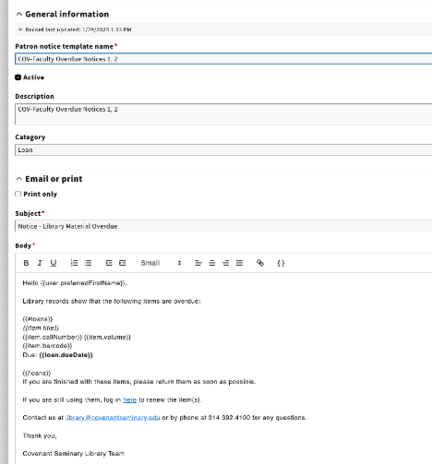
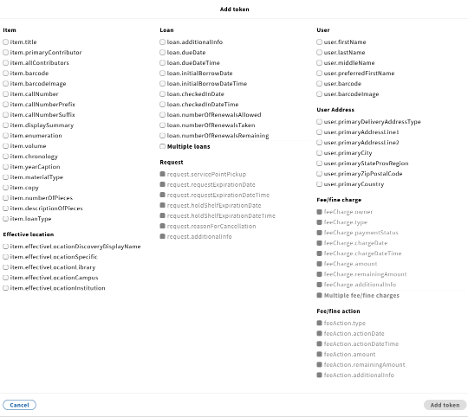
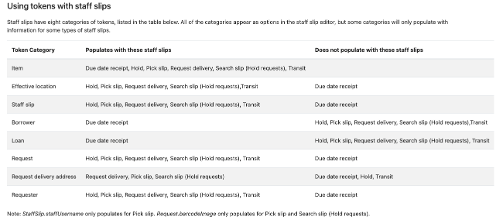
Staff slips have eight categories of tokens, listed in the table below. All of the categories appear as options in the staff slip editor, but some categories will only populate with information for some types of staff slips.
Don’t forget to add a Manual Fine/Fee template
Creating a new patron notice template
- In the Patron notice templates pane, click New.
- In the New patron notice template window, enter a Patron notice template name for the notice.
- Clear the Active checkbox if you do not want the notice to be available for use in notice policies.
- Optional: Enter a Description in the box.
- Select a Category for the template. Categories determine which section of the notice policy the notice can be used in and which tokens are available to be used in the body of the email.
- In the Email or print section, select the Print only checkbox to delete the subject line. Notices are printed in the Users search results pane. Currently, only Reminder fees are able to be collected in the nightly print job.
- Clear the Print only checkbox if you want to email the notice, and enter a Subject.
- Enter a Body for the email sent to the patron. Click { } to add tokens to the notice. Tokens fill in the item, loan, request, or user information based on the selected variables related to the notice event.
- Optional: Click Preview to view a preview of the notice.
- Click Save & close. The notice is saved and appears in the Patron notice templates pane.
Duplicating a patron notice template
- In the Patron notice templates pane, select the patron notice template you want to duplicate.
- In the patron notice template details pane, click Actions > Duplicate. A New patron notice template window appears with the same patron notice information as the notice you chose to duplicate.
- Edit the notice name and any other details. You cannot have two notices with the same name.
- Click Save & close. The patron notice template is saved and appears in the Patron notice templates pane.
Editing a patron notice template
- In the Patron notice templates pane, select the patron notice template you want to edit.
- In the Patron notice template details pane, click Actions > Edit.
- Edit the patron notice template.
- Click Save & close. The template is updated.
Deleting a patron notice template
- In the Patron notice templates pane, select the patron notice template you want to delete.
- In the Patron notice template details pane, click Actions > Delete.
- In the Delete Patron notice templates dialog, click Delete. The template is deleted and a confirmation message appears. Note that you cannot delete a template that is being used in a Patron notice policy.
Policies: When & to Whom do the notices go out and under what conditions.
Elements include:
· Name
· Description of the Policy (always handy) – is it a Loan, Request, or Fine/Fee Notice?
· Pick your Template; Format (email) and the triggering event
· When to send, how often to send (this is especially important if it is a short-term or a long-term loan if you want to send things throughout the day)
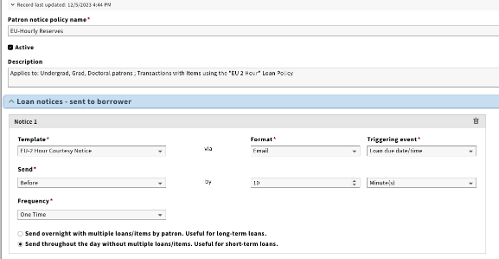
Some Samples from Evangel University:
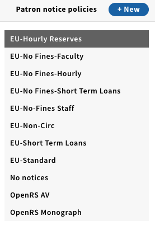
Loan Notice:
Sent to the Borrower
Request Notice:
Sent to the Requester
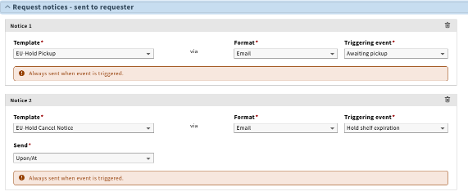
· Hold Pickup
· Hold Cancellation
Both of the above happen when the event is triggered.
Fine/Fee Notice:
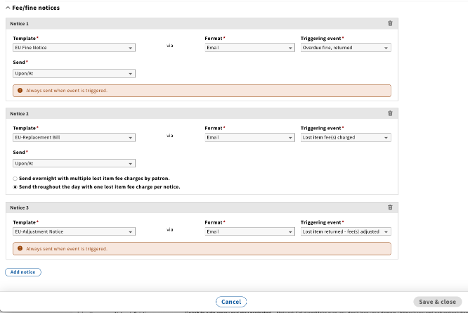
Template:
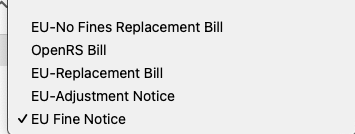
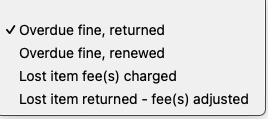
Triggering Event:
When to Send:

Creating a patron notice policy
1. In the Patron notice policies pane, click New.
2. In the New patron notice policy window, enter a Patron notice policy name. Note: The policy name is what you will see in Circulation rules.
3. To make the policy available to Circulation rules, select Active. You may want to clear the checkbox if the policy is not in use but you do not want to delete it.
4. Optional: Enter a Description in the box.
5. Click Add notice in the particular notice section that you want to set up. See Loan notices, Request notices, and Fee/fine notices for more information.
6. Select a notice Template. Depending on the type of notice you are setting up, different templates will appear. Templates are created in Patron notice templates. Templates can be used more than once in a policy.
7. Select the Format the notice will be sent as. Currently, email is the only option.
8. Select the Triggering event. This event triggers the system to send a notice. Depending on the event, you might have the option to select a time period before or after.
9. If you select a time-based event, the Send drop-down list appears. Select to send the request Upon/At, Before, or After the event (settings variable on the Triggering event).
10. If you select Before or After in the previous step, you will see the Frequency drop-down list. Select whether to send the notice One Time or Recurring.
11. Click Save & close. The policy is saved and appears in the Patron notice policies pane.
Loan notices triggering events
Check in. The notice is sent when items are checked in. Additionally, the notice is always sent with multiples by patron by session. The template you select must be configured for multiple loans/items.
Check out. The notice is sent when items are checked out. Additionally, the notice is always sent with multiples by patron by session. The template you select must be configured for multiple loans/items.
Item renewed. The notice is sent when items are renewed. However, the template you select must not be configured for multiple loans/items.
Loan due date/time. The notice is sent before, after, or when an item is due. Select when the notice is sent from the Send drop-down list:
· To send the notice when the item is due, select Upon/At.
· To send the notice before the item is due, select Before. Then, determine the Frequency of the notice. To send the notice once, select One Time. To send the notice multiple times before the item is due, select Recurring and enter how often the notice sends until the due date is reached.
· To send the notice after the item is due, select After. Then, determine the Frequency of the notice. To send the notice once, after the item is due, select One Time. To send the notice multiple times after the item is due, select Recurring and enter how often the notice sends until the item is returned or renewed.
· Additionally, select whether you want to Send overnight with multiple loans/items by patron. Useful for long-term loans. or Send throughout the day without multiple loans/items. Useful for short-term loans.
Loan due date change. The notice is sent when an item’s due date/time is manually changed.
Item recalled. The notice is sent when an item is recalled.
Item aged to lost. The notice is sent when or after an item is aged to lost. Select when the notice is sent from the Send drop-down list:
· To send the notice when the item ages to lost, select Upon/At.
· To send the notice after the item ages to lost; select After. Then, determine the Frequency of the notice. To send the notice once, after the item ages to lost, select One Time. To send the notice multiple times after the item ages to lost, select Recurring and enter how often the notice sends while the status remains aged to lost.
Request notices triggering events
For all request notices, the system is scanned every five minutes for triggering events and sent when a triggering event is detected.
Awaiting pickup. The notice is sent when a requested item is checked in at the pickup service point specified in the request.
Page request. The notice is sent when a page request is placed.
Hold request. The notice is sent when an item-level hold request is placed. You can select a notice to send when title-level holds are placed in Settings > Circulation > Title level requests.
Recall request. The notice is sent when a recall request is placed.
Cancel request. The notice is sent when a request is cancelled. Note: Title level hold request cancellations will send the notice selected in Settings > Circulation > Title level requests.
Hold shelf expiration. The notice is sent before or when the item is no longer available for pickup on the hold shelf. Select when the notice is sent from the Send drop-down list:
· To send the notice when the item’s time on the hold shelf expires, select Upon/At.
· To send the notice before the item’s time on the hold shelf expires, select Before. Then, determine the Frequency of the notice. To send the notice once, select One Time. To send the notice multiple times, select Recurring and enter how often the notice sends until the hold shelf expiration is reached.
Request expiration. The notice is sent before or when the request expires. Select when the notice is sent from the Send drop-down list:
· To send the notice when the request expires, select Upon/At.
· To send the notice before the request expires, select Before. Then, determine the Frequency of the notice. To send the notice once, before the request expires, select One Time. To send the notice multiple times, select Recurring and enter how often the notice sends until the request expiration is reached.
Fee/fine notices triggering events
The system is scanned every five minutes for triggering events and fee/fine notices are sent when a triggering event is detected.
Overdue fine, returned. The notice is sent after or when an overdue fine is charged to a patron. The fine would be charged when the item is returned. Overdue fine, returned notices always bundle fees/fines. The template you select should be configured for multiple loans. Select when the notice is sent from the Send drop-down list:
· To send the notice when the overdue fine is charged, select Upon/At.
· To send the notice after the overdue fine is charged, select After. Then, determine the Frequency of the notice. To send the notice once, select One Time. To send the notice multiple times, select Recurring and enter how often the notice sends until the fee/fine is closed.
Overdue fine, renewed. The notice is sent after or when an overdue fine is charged to a patron. The fine would be charged when the item is renewed. Overdue fine, renewed notices always bundle fees/fines. The template you select should be configured for multiple loans. Select when the notice is sent from the Send drop-down list:
· To send the notice when the overdue fine is charged, select Upon/At.
· To send the notice after the overdue fine is charged, select After. Then, determine the Frequency of the notice. To send the notice once, select One Time. To send the notice multiple times, select Recurring and enter how often the notice sends until the fee/fine is closed.
Lost item fee(s) charged. The notice is sent after or when a lost item fee is charged to a patron. The notice will be sent for both set cost and actual cost lost item fees.
Select when the notice is sent from the Send drop-down list:
· To send the notice when the lost item fee is charged, select Upon/At.
· To send the notice after the lost item fee is charged, select After. Then, determine the Frequency of the notice. To send the notice once, select One Time. To send the notice multiple times, select Recurring and enter how often the notice sends until the fee is closed.
Select whether multiple lost item fee notices are bundled together:
· To bunch all a patron’s open lost item fees together in one email (processed at 11:59pm) choose Send overnight with multiple lost item fee charges by patron. The template you select should be configured for multiple loans.
· To send notices throughout the day (typically processed every five minutes, with a separate notice for each fee/fine charged) choose Send throughout the day with one lost item fee charge per notice. The template you select should not be configured for multiple loans.
Lost item returned - fee(s) adjusted. The notice is sent when the event is triggered, i.e. when the lost item is checked in. The notice will be sent for both set cost and actual cost lost item fees.